Welcome to The Outlawz first blog hop!
In case you do not know about the party... The Outlawz is celebrating reaching 1000 members with games, puzzles, scavenger hunts and over $800.00 in prizes!! It's a party you do not want to miss!
We have quite a line-up for you filled with great tutorials! The DT has been busy working hard to present to you techniques and awesome inspirations! Be sure to comment on all of the blogs along the way to be eligible for 9 yes 9 prizes! Each blog is giving away a prize and one random grand prize will be drawn at The Outlawz for those of you who have commented on every blog and entered your name into Inlinkz here.
This blog is sponsor this week by:

All winners will be announce at The Outlawz on October 12.
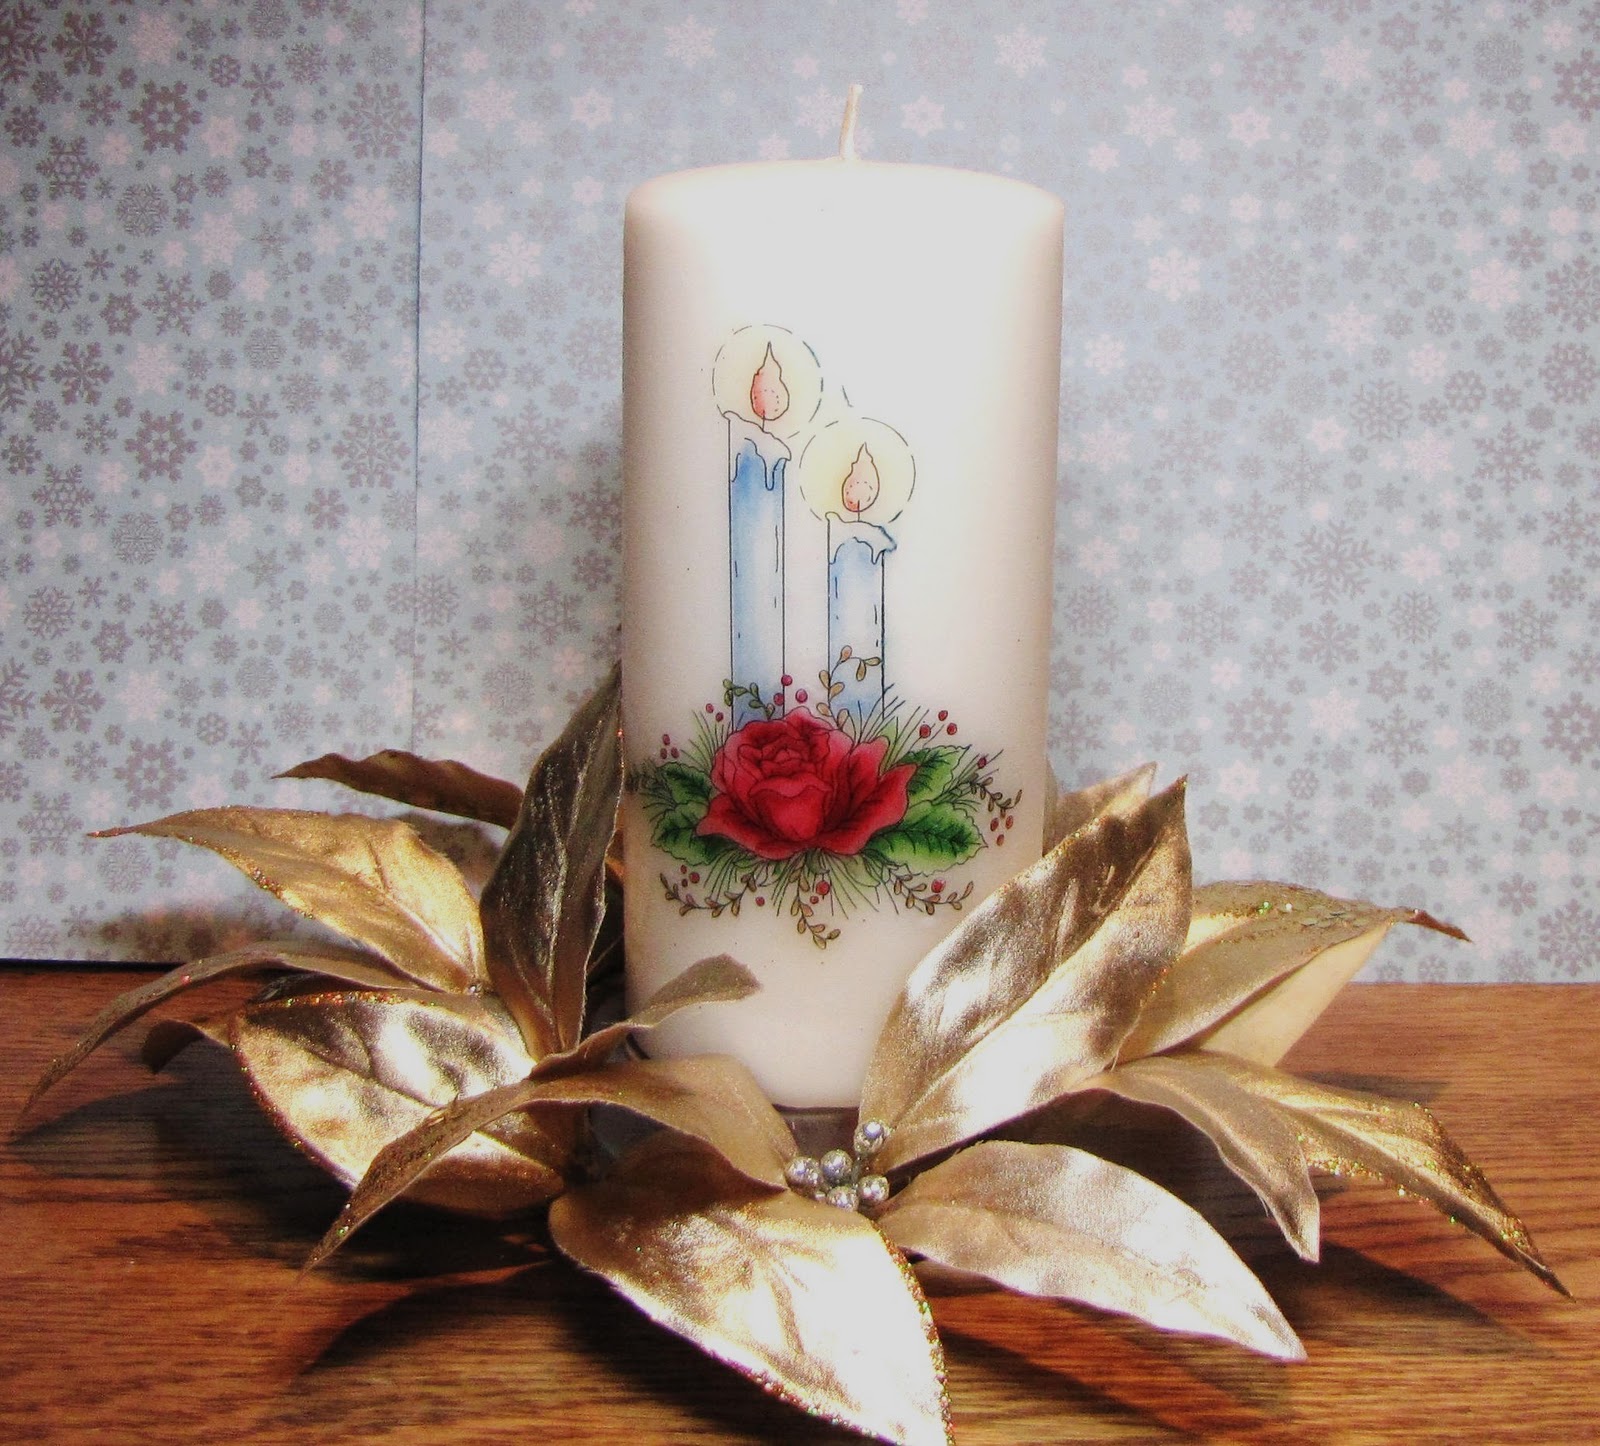
My tutorial is melting a digital colored image onto a candle.

Easy Peasy
Supplies needed: Tissue paper, wax paper, digital or stamped image. Copics or other coloring medium, heat gun, card stock and glue stick. You only need glue stick and card stock if you are using a digital image.

Glue corners of tissue paper onto card stock to print the digital image onto. You do not want any excess paper hanging over the card stock or it will get stuck and ripped in the printer.

This is what your digital image looks like on the paper after printing.

Color your image with your favorite medium. I used Copics. You are unable to blend like you do on regular paper, however, you still get great highlights and shadowing. Place something under the tissue paper while coloring for your ink goes right through to the other side.

This is how much ink leaked through to the other side of the paper.


You want to went the tissue paper slightly! I wet the tip of my finger and slightly moisten the corners to help the tissue to adhere to the candle. You do not want any of the image to become wet for the ink will bleed.


The total cost $1.50 for the candle for I had everything else. You can burn these candles and they make gorgeous gifts for all occasions.

Don't forget to leave a comment to be eligible for the drawing!
You must be a member of The Outlawz to win!
You receive an additional chance if you follow.
Good luck everyone!
You want to hop over to my sis-tah Maureen's to see another great tutorial! If you stumbled onto my blog without going through The Outlawz ....I am the first one on the list so keep on hopping!
Good luck and thank you for stopping by!!!
Colleen, oh gosh you make this look so easy but I'm sure it will take me hours and yes, I'm going to try. Your Santa candle is just perfect for many of my little gifts I need to make.
ReplyDeleteOff I go, hop, hop, oh, stunning candles. Hugs, Lori m
Colleen aren't you amazing! I am just so honored to be in this group with you!anaRy
ReplyDeleteWhat a great gift idea Colleen! TFS
ReplyDeleteHuggs
Thanks! I'm going to have to try this out!
ReplyDelete-Kristina "Mama Bear" Stonich
I've always wanted to make one of these. Thanks for the inspiration and instructions.
ReplyDeleteBabe
youiesmom@att.net
I've seen this before but never tried it (I was worried about the tissue paper catching fire). Thanks for the tutorial, I can see myself making some gifts in the future.
ReplyDeleteGreat, great tutorial! I never realized you could use a digi image for this technique. Im amazed at how easy it seems! I definitely want to give this a try!
ReplyDeleteCame over from the Outlawz 1000 member party. My forum name is Nadine (wahinelei). Thanks for the tutorial as well as the chance to win such great prizes!
Love the tutorial Colleen, and those beautiful candles! Couldn't sleep, so this is great fun to keep me occupied until I doze back off! The 1000 Member Party is off to a great start! Big hugs!
ReplyDeleteWhat a great idea for teacher gifts! I can't get over how versatile my copics are- thanks so much for sharing!
ReplyDeleteoops, Outlawz name is Sarah Welleford. thanks again!
ReplyDeleteSweet! I tried this last x-mas with my hairdrier, it did work but o'boy it was hot and took for ages! Now I own a heatgun but haven't made any candels yet but I sure will now! Thanks for the insperation. New follower of your blog but "old" member of the Outlaws.
ReplyDeletexx/MulleSnuttan
Haven't tried this Colleen....will have to give it a go after seeing your fabulous tute :)
ReplyDeleteHugs xx
I have wanted to know how to do this for SUCH long time! Thanks so much for the clear and simple tutorial, and for sharing it on this (what I know will be) a FABULO9US Blog Hop.
ReplyDeleteLuv n huggz
Jen Leeflang aka JenLee
I never knew it will be so simple to make that! Your colouring is just amazing! Love the candle! Happy hopping ;) x
ReplyDeleteWow, that was different! Glad I popped by Colleen!
ReplyDeleteWhat an awesome tutorial Colleen, I may just brave this one this year!! Amazing gifts!
ReplyDeleteHugs~Bren
I've always wanted to know how to do this!! What a fabulous tute an such an amazingly brilliant and cost effective gift for the holidays!! I'm so happy to be a part of the team!! ~hugs
ReplyDeleteAwesome project Colleen! I'll have to try this for x-mas gifts :} Party WhooHoo!!
ReplyDeleteThis is so gorgeous! I'm going to copy the directions so I can give this a whirl! What a lovely gift this would make!
ReplyDeleteHugz,
Roxann
Gorgeous candles!!
ReplyDeleteSilvia2
Wow, amazing Colleen!!!! What a beautiful center piece for the holidays!!!
ReplyDeleteGorgeous!!! Love this project!! I have stocked up on candles to do this project! :D
ReplyDeleteWhat an awesome tutorial. Thank you for sharing it with us. Most definitely want to try this one! Hugs, Lee Ferns
ReplyDeleteColleen, I can't wait to try this. This would be much better then the old way I had learned. Beautiful.
ReplyDeleteThis comment has been removed by the author.
ReplyDeleteBeautiful candles. Thanks for the tutorial.
ReplyDeleteOutlawz Jamie
That was an AWESOME tutorial, Colleen--we are going to do this for gifties, very fun!
ReplyDeletetrisha too at Outlawz and following you . . .
:)
I have wondered how to do this with Digis... Thanks so much!
ReplyDeleteThis is gorgeous! Something I will have to check out! My user name is Kim Kelley
ReplyDeleteVery fun technique!! Beautiful candles!!
ReplyDeleteWonderful candles and excellent tutorial! Thanks, Colleen.
ReplyDeleteOooh, I love this idea!!! Thanks for sharing. I'm definately gonna be making some of this as presents this year. Having a blast at Outlawz first hop, I'm off to my next stop :) -katt
ReplyDeleteWow, I have wondered how to do these. Thanks for sharing this.
ReplyDeleteRhonda Miller
A great tutorial, Colleen!! I never tried it... but I sure going to do it now, thank you for sharing it!! Hugs!!
ReplyDeleteBeautiful candles, wonderful tutorial, TFS.
ReplyDeleteColleen, Awesome tutorial and gorgeous candles!! I am going to give this a try. You make is seem so easy!
ReplyDeleteAwesome project, Collen! And love the tutorial! The Outlawz Party is so fun!!!
ReplyDeleteI have been wanting to try this out. I've even had a candle set aside to use, but until today I just haven't had a really clear tutorial on how to do it, so a huge thank you to you.
ReplyDelete:) Of course you made me smile and you shared a great tutorial too!! One of these days I'm actually going to try this out!!
ReplyDeleteI need to find somewhere to buy the white pillar candles and I keep forgetting!!
Thanks for a reminder! Hopping over to see Mo!!
Oh what a gorgeous creation. Great gift giving project.
ReplyDeletewhat a great tut. and a stunning candle..lovelyn gift for a lucky someone..ummm did you need my address??..lol..loves ya
ReplyDeleteOOps my otlawz name is Gail Neduzak..loves ya
ReplyDeleteGreat tutorial! Thanks for sharing such a fun idea!!
ReplyDelete~ Cassy Hurst
Oh, I have to try this. I have several candles that I can try it out. Thanks for the wonderful tutorial and all the great things you do on Outlawz.
ReplyDeleteHugs,
Donna Rinckel
Beautiful candles! What great gift ideas, thanks for the great tut and inspiration!
ReplyDeleteGreat Tutorial
ReplyDeleteBeautiful candle
Thanks !
DQ
Great tutorial, Colleen. I made some of these last year and you have inspired me to make some more. They make great gifts when you want to give just a little something from the heart.
ReplyDeleteMy Outlawz member name is Teresa Arsenault and I am already a follower of your blog.
Blessings,
Teresa
This comment has been removed by the author.
ReplyDeleteWhat a great idea and detailed tutorial. So glad to see that digis will print okay on the tissue. My Outlawz name is Julie Elak!
ReplyDeleteThanks :>)
Oh my what a clever idea. I will definatly have to try this sometime.
ReplyDeleteLove Love this and am definitely going to try. I am also a follower through feedblitzZ!! thanks for the chance to win. I am also a member of Outlawz!!
ReplyDeleteslbela59
This is a great idea. I have to try it!
ReplyDeleteGreat tutorial! I've been wanting to try this for a long time.
ReplyDeleteMichelle Rutledge
Windsorm
This is a neat idea that I had never thought of. I will try it!
ReplyDeleteTammy White
Beautiful candle. Perfect image. Clear tutorial. I've got to try it! Thanks, Colleen!
ReplyDeleteThank you so much for the tutorial! So unique and fun!
ReplyDeleteMichelle Houghton
You make it look so easy and cute. What a great project for kids and adults to do together. Thanks for sharing!
ReplyDeletesyd
sydegan@hotmail.com
Colleen,
ReplyDeleteThanks for sharing this great tutorial!. I think this idea might be just the ticket for my hand made Christmas gifts for my siblings! Also, Thanks for pointing me in the right direction!!.
Aren`t the Holiday Peeker Images adorable, just like all of the Peeker images.
Barb
miatagal@shaw.ca
Hi there!
ReplyDeleteWow, I learnt something new today haha~
I really think this is awesome! Gonna use this to make the candles at my friend's birthday next month!
Thanks for inspiring me!
My Outlawz username is Jang-Art.
VERY pretty candles!!! I love making those! Thanks for a chance to win!
ReplyDeleteThanks for a great tutorial. I've made these before but didn't know to hold tight in the back and I can see where that would be a great help in keeping the air bubbles out. Great information.
ReplyDeleteThat's awesome! I might have to try that out for xmas presents! :) My Member name - Jen P
ReplyDeleteA wonderful tutorial, Colleen. I had no idea I could print on tissue paper like that! I'm very excited to try this. Your candles are fab! ;D
ReplyDeleteThis is gorgious and would make a great gift im on my way to get some candles
ReplyDeleteThis comment has been removed by the author.
ReplyDeleteYou made this tute so easy to follow Colleen. :-) Your candles are beautiful.
ReplyDeleteI'm having so much fun doing all the party things. I'm following you now and my TO name is Tracy MacDonald.
You make this look sooo easy but when I do it, it doesn't come out as beautiful as yours. I will have to try again and be more patient. Thanks
ReplyDeleteSarah Warren
I am reposting because I forgot to leave my name.
This is great technique and your step-by-step tutorial is so easy to follow. Thanks.
ReplyDeleteVesna Rastovski :)
What wonderful tips on your blog!!! I'm going to run out of ink printing some of them for my folders.
ReplyDeleteThanks ...... Anne
Wonderful tutorial! These would make great Holiday gifts for friends and family.
ReplyDeleteWOW that is so cool!! Will have to put this on my too do list for sure! Can you use a digi that is already colored and printed out?
ReplyDeleteThank you! Rosie Guiher
AWE this is a Great idea.
ReplyDeleteSo does the wax paper stay adhered to the candle then you have to cut the excess wax paper off that you were using as the handle???
My outlawz name is Heidi Brawley
I've used this technique using regular stamps, using digi's takes them to a whole new level. Can't wait to try! My Outlawz name is JoAnn Peck
ReplyDeleteAwesome tutorial! Great gift idea! Anitamocha
ReplyDeletegreat idea, love that Santa face, wow hes awesome, nice tutorial Colleen ty
ReplyDeleteThis is such a great idea and what a great gift idea. I've tried this using a stamped image and could not for the life of me get the tissue to adhere to the candle and ended up in a right old mess ... I think I'm going to try again using your tips and I am sure it will work this time round .. Thanks for taking the time to share ... Happy Blog Hop :D Julie (Username Julie Hales)
ReplyDeleteThis is absolutely wonderful! Love how vibrant the colors are using copics! Wonder if you would get the same results using Prisma color pencils! Beautiful candles! Thank you for the awesome tutorial!
ReplyDeleteThis is so cool. I love this tutorial. Thanks for the info!!
ReplyDeleteWow - not only a terrific tutorial, but you chose such a beautiful image and did such a super job with it. TFS!!!
ReplyDeleteFabulous idea Colleen and so easy to do. Your image is gorgeous.
ReplyDeleteBEE U TI FUL candle! I love making candles, will be starting on them soon I'm sure :O)
ReplyDeleteHi & fabulous candles, just perfect for the festive season. Can I ask your advice too? I have just discovered that I was the extremely lucky $50 Oozak winner for the September challenges. What do I have to do now? Who should I contact regarding my win?
ReplyDeleteThanks so much for your help,
Tine (Crafting Christine)
http://craftingchristine.blogspot.com/
Terrific technique! While I've seen it before and done it, yours are the best I've seen.
ReplyDeleteCindy Royal (outlawz)
WOW, WOW, WOW. Well, I just learned a new technique. That is amazing and I sure do love a bargain for something as elegant and easy as this! Beautifully done!
ReplyDeleteHopping in from the Outlawz! I am DEFINITELY a new follower.
:O)
Jessica Shelton
Fabulous technique. I did not know you could do this with a digi image. Great!
ReplyDeleteGreat tutorial Colleen. I've always thought this was a difficult technique, but your explanation makes it sooooo doable. Thanks
ReplyDeleteShelb Thomas
I have always wondered how people do this! Thanks for sharing, I am going to try this for Christmas gifts.
ReplyDelete- Tracy S
Just what I needed for some little gifts! Thanks for the tutorial. I'm an Outlawz member.
ReplyDeleteR/
See this AWESOME card and tutorial. its cool and pretty enough nice crafting work.
ReplyDeleteHotel Key Card
membership card
That was one of the best tutorials I have seen. And you are only the first stop on the blog hop? I can not wait to try this. Unfortunately funds are tight for Christmas, but I do happen to have two pillar candles in my candle stash that are going to be beautifully decorated by the end of the weekend!! Thanks so much for sharing this wonderful idea with us! I am a member of the Outlawz! yeah! Kristine:)
ReplyDelete