Followers

Saturday, September 11, 2010

Elisabeth Bell Digi Showing

Happy Saturday everyone!  Today is the day we have all be waiting for and that is to see this month's new  Elisabeth Bell Digi! We have been giving sneak peaks all week! Do you think you know what it is for sure?? Let me tell ya.. it is the sweetest digi stamp and I know you will love her as much as I do!  Here she is the "Catch of the Day!"

Drum roll please! 

Ta da!


Did you guess right? I was really surprise how many guessed correctly on the first peak what she was! I wouldn't have thought you ever guess a child in a mermaids custom, inside a grocery cart! I'll tell ya...you have more insight then me!! YIKES!! For some reason my yellows are green and no matter how I tried to fix it in Photo Shop I couldn't ditch the green....including the yellow in her hair! I really didn't color her hair green!! Trust me! Any who you want to see what all the designers did with this cutie so make sure you hop on over to the Digi Bell DT Blog  and take a look around,  for you surely will not be disappointed! You can see all of Elisabeth Bells Digi's collection here. Isn't it fun to see an image you love and have it instantaneously?

Challenges:
    Supplies:
    • Copics
      • Blue:  B18, B16, B14. B12, BG02, BG000
      • Yellow:  (the bottom of her cart is bright yellow) Y06, Y04, Y02 Y00
      • Red: R28, R24, R22, R21
      • Skin: E11, E00, E000
      • Brown: E35, E31, E30
      • Hair: E35, E31, YR21 (no green!!!)
    • Paper: Basic Grey
    • Stickles: Diamond added to the mermaid costume and head band
    • Diamond Glaze to the buggy to make it look like plastic
    • Flowers: Wild Orhids Crafts
    • Cherries and circles: Nestabilities
    • Ribbon: Offry
    Tip of the day:  Diamond Glaze is  a water-based dimensional adhesive. It is great as a glue, but even greater to add on top of anything to make it shine! It is also mixable and I have mixed it with water, stickles and copic colors to add a 3D effect to my project. You will love it and it does not change your copic coloring!

    Thank you for stopping by and to everyone who has left comments or followed me....thank you from the bottom of my heart, it brightens my day big time. God Bless the USA and all the other countries on this date 9/11 and every day there after!

    Friday, September 10, 2010

    Teddy Stampers Guest Designer

    Hello everyone and Happy Friday to ya! Yesterday was my third day at the athletic club with the personal trainer. It took everything I had to go and let me tell ya, I am still feeling it today! Thank goodness for Aleve! It has been my best friend yesterday and last night!! I was doing hurls, curls, lifting, pushing, squatting and in positions I haven't been in for a very long time and my body let me know it too!

    Exciting news! Teddy Stampers asked me to be their guest designer for the month of September! I am so excited! Teddy Stampers was the very first blog I joined when I entered blog land!! I love teddy bears and collect Cherish Teddies, Boyds and Stuff Teddy Bears! Yep, I am still a kid at heart who loves her teddy bears!

    The Theme at Teddy Stampers this week is "Back to School"   My card was made with "Teddy Bear Teacher" designed by Meljen Digital Stamps! If you love 'warm and fuzzy' designs that make you smile and inspire creativity then you will love Meljens Digitals Images!

    Challenges:


     Isn't she a hoot with all her books and the apple on top! What was your favorite subject in school? Mine was Science! I loved my ninth grade Science teacher who inspired  me to love anatomy which, eventually led me to becoming a paramedic and ER/ICU nurse.  Did you have a teacher inspire you?

    I will be back later tonight at 7 PM Arizona Time with the Elisabeth Bell new digi release and the tip of the day! Stay tune for some fun times and thank you for stopping in! Hugzzzzzz

    Friday, September 3, 2010

    Happy Friday and Labor Day Weekend!

     Wow, can you believe this is the last weekend of the summer months. For those who do not live in the US.   Do you have plans for the weekend? Sunday night I will be driving to Pittsburgh to be Copic certified with Colleen Schaan on Monday.  Once I am certified I can teach Copic's at the local craft store. No, you don't need to be certified to teach, but they want to see the credentials...so that is where I am spending my labor day!


    My card today if using a digital image that I do not know where I purchased it. Back in the beginning I didn't think to keep a record on who's digi's were who's. Please tell me if you recognize it so I can give credit to the artist! Now I keep my digi's in files by the designers web address and it makes life so much easier!


    I just love this image!! Let me tell you...I love teddy bears! You can tell immediately after walking through my front door and I gave a lot of my stuff bears away or to charities! The granddaughters love coming here!

    Challenges:


    Supplies:
    • DCWV: The Natural Stack...12 x 12 paper pad is perfect for making men's cards! I love it!
    • Cryogen White : Perfect paper for Copics
    • Brad and pearls: Prima
    • Tim Holtz: Antique Linen
    • Copic markers:
      • Blue: B00, B01, B04
      • Purple: V12, V15, V17
      • Orange: YR07. YR04, YR02
      • Green: G05, G03, G00
      • Browns: I think all of them!!! 
    No Tip of the Day! Please read older post to see what ones you missed!

    Thank you for stopping by and have a super, fantastic weekend!

    Wednesday, September 1, 2010

    Party Time Tuesday Design Team!

    Hello blog land!! Lots more exciting news my friends!  My announcement I promised for today is: Party Time Tuesday asked me to be a member of their design team and of course I said "YES!" I love it there. Each week you make a card to a theme, but there's a catch! You MUST have a sentiment on the front of the card saying "Happy Birthday," "Best Wishes," "Your day!" You get the point! Great way to get those birthday cards made! Like I said before "made" I didn't say mail! My daughter, Renae's birthday was yesterday and I am sitting her looking at her card. I do not know why I can't get them in the mail on time! I really don't!

    Another exciting thing happened today! I received an email from Card-Making-Magic.com
    stating they accepted the tutorial I did on Monday (see below) and it is now part of their tutorials! If you have a sec. could you hop over there,  comment on it and rate it!!! If you take the time, Thank you! You will love this web site!! Full of tutorials and all kinds of good info on card making!

    Not done yet!! Tonight I clicked on Simply Scrapping Crafts and low behold there were my two cards I made on Monday featured for the month of August and the flower card, plus another card I made were August gallery favorites! I tell ya...it's a good week here!

    One last thing!! Wait until you see Elisabeth Bell's new digi for September!! It is so stinking cute...I love it and can't wait to color it  for the upcoming showing on Friday, September 10. Elisabeth moved the date back one week since we just received the most adorable image today!!

    Finally! My card for my  first DT challenge at PTT! The little girl in my card is one of Elisabeth Bell images made exclusively for Susanna Custom Art and Card Design. Isn't she adorable...makes you want to pack up a picnic basket and go to the park!

    Challenges:

    Supplies:
    • Cryogen White Paper
    • Charm Blue Moon at SCACD
    • DP Basic Grey
    • Prima pearls
    • Rose: Wild Orchids Crafts
    • Ribbon: Offry
    • Copic: 
      • I will list these later on today. If you need to know sooner...please send me an email!
    Thank you for coming and seeing me. If you wouldn't mind please become a follower so I can see your creations too!

    Monday, August 30, 2010

    Simply Scrapping Crafts Design Team!

     Hello! Remember me? LOL..I have been MIA for most of the last two weeks.  This is going to be a super week for several announcements all week long!  I have been asked to join the Simply Scrapping Crafts Design Team! Wow, that is a mouthful, how about SSC DT!! SSC is the place you want to be if you love learning, challenges, a whole page  of groups outside of SCC. I will be doing the copic challenges! Right up my alley wouldn't you say! Before vacation I was chosen to be a guest designer on Elisabeth Bell Design team for September and October! We will be getting the new digi today and I just can't wait to see it! And, on Wednesday I will have another announcement. Things are looking up!

    My card business is starting to pick up pretty good considering it is only by word of mouth at this point! Good days lately!

    I made two cards today and  you are going to see red for quite a bit for the next week! I had specific orders on my cards and what can a girl do!

    Challenges:
    1. Flutter-by-Wednesday:  Open and there is suppose to be a BIG announcement on Wednesday! 
    2. Alys Sunday Challenge: use pink (I have a pink rose!)
    3. Cowgirls Sunday Challenge: Flowers and embellishments
    4. The Crafty Pad: Pearls (Wedding Card)
    5. One Stitch At a Time:  Girly or color scheme (Wedding, Ivory and red)
    6. The Paper Players: Anything goes
    7. Be Crafty: anything goes
    8. Cinema Saturday: Anything goes 
    9. Crafty Emma's Store: Anything goes
    10. Lexie's Creations: Embossing
    11. Mark's Finest Paper: Friend card ...Red flower card
    12. Our Daily Bread: Embossing
    13. Alphabet Challenge: R for roses! 
    14. Fairy Fun Friday : Pearls and lace...wedding card
    15. Stamping For The Weekend: Anything goes
    First Card I do not know where I got the digi from. So sorry and if you know and inform I will list the designer.

    Supplies:
    • Cryogen
    • Copics
      • Red: R39, R37, R35, R32
      • Green: G94,YG23, YG24, YG21, YG03.YG01
      • Ribbon: E-bay
    • Friskar Sunburst Punch

    Supplies:
    • Karen Doodles Digi: Here comes the bride!
    • White roses colored with copic and alcohol. See Tip of the Day
    • Cream Color Gown: E53, E51, E50
    • Red top: R39, R37, R35,  R32
    • Market Stewart leaf punch
    • Friskar Sunburst Border Punch

    Inside

    Tip of the day:   Coloring lace, ribbon, flowers. You can use Colorless blender solution or 91-95% Isopropyl rubbing alcohol, which is a LOT cheaper. Pour some alcohol into its lid or very small container. Lay down the copic color you want onto an acrylic block. You do this by pressing the tip of the pen onto the block with gentle pressure. Take a regular small paintbrush and dip it into the alcohol...the more alcohol on the brush the lighter the color. If you want a vibrant color, wipe the brush one time onto a paper towel. Next, take the brush and mix it with your color on the acrylic block and brush onto flower, lace etc. You will see that you use very tiny bit of marker. You can make it as dark or as light as you want by how much alcohol solution you have on the brush. Here is a white rose and white lace I did with R29 in a super hurry to show you!
    I hope you enjoyed  looking as much as I have enjoyed creating!! Thank you! It's a good week!

      Friday, August 27, 2010

      An award from Sharon!

      Yippee! It's Friday! I had the most pleasant surprise given to me by my very special friend Sharon! It is an award for beautiful blog with a little bit extra! I am so proud to have received this from someone who is so dear to me. Thank you Sharon!
      Accepting the award you need to do the following:
      1. Thank the person who gave it to me. Sharon thank you! It means a lot!
      2. Put it on my blog
      3. Mention 3 things I love doing. I have more than 3!
        1. I love doing things with my hubby and family
        2. My dogs make me laugh every single day!
        3. We know what this one is! Making cards! 
      4. My favorite picture: Hmmmm hard one. I will have to post it later for my daughter in law has it. In November I had my whole family together...course others are in it also. But, I love seeing everyone in one place!
      5. I have to pass the award to five other people! Well, if I was the one starting it Sharon most definitely would get a spot!
        1. Lisa Haines: Who keeps me updated and gives me encouragement every single day!
        2. Suzanne Dean: She doesn't post awards on her blog, she's getting one anyways! Suzanne has taught me so much and has the patience of a saint. She is the reason I am where I am today! She is also the sole reason I am going broke for she demonstrates and shows new products all the time!!
        3. Danni: blog is entertaining  and full of blogs to visit and challenges to be done. She started another blog called Flutter-by-Wednesdays which requires a butterfly, angel or fairy on your card! I need all the angels I can get!
        4. Party Time Tuesdays; Kristie helps me keep on tract making birthday cards on time. I didn't say mail...I said "made" for each week is a theme around Birthdays!
        5. Elisabeth Bell:  Digi Bells DT  If you love Eisabeth Bell's stamps and digi's as  much as I do then check it out!
       Thank you Sharon for this honor!

      Tuesday, August 24, 2010

      We are home!

      How are you? It feels like forever since I last written! Our plane landed around 6 PM last night and we came home to two jumping, kissie, lickie happy dogs! They were so excited to see us and nothing is greater than to see wagging tails greeting you at the door rather you have been gone nine hours or nine days! We had an awesome time with our children and grandchildren and it just warms your heart when everything goes perfectly! Christian, Abby, Trinity and Olivia were fabulous to be around! It is really special to see how much they have grown and mature. They're no longer babies and never knew how special it would be to talk to them as children instead of toddlers. They are so loving and beautiful and I enjoyed every minute with them!

      There was a T-shirt coloring day at our Resort! Yippee, I was really excited for it allow me to color! Here is what we did!


       This is a book bag Trinity, 9 and I colored together!


      Christian, 11 colored this all by himself!
      I thought I had Bill's T-shirt and mine but it is not on the disc:(


      Trinity on the beach!


      Christian boogie boarding


      Trinity laughing at her Grandpah!  I love this picture of her!  You see the blanket behind her....that is where Christian is!


      He had to get his hat on before I took his picture! His hair was messed up!!


      Reef Ocean Resort is right on the beach!


      On the beach looking back.


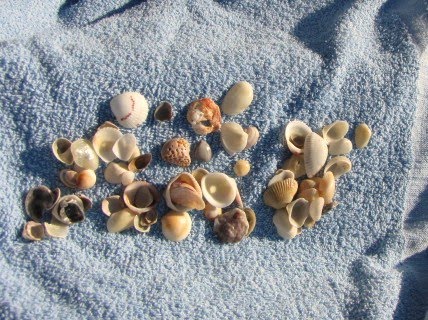
      Bill, Trinity and Christian went to find shells for me to place on my cards! They were so sweet and wanted the perfect shells for grandma!


      Our grandchildren in Florida!
      Trinity (9), Abby (8) Christian (11), and Olivia soon to be 5!


      See you tomorrow!! Thank you for allowing me to share my time with you!

      Wednesday, August 18, 2010

      Craft Alley Sketch

      Hello! Let me tell ya... it is hot, hot, hot here in Vero Beach! The temperature was 93 but it felt 20 degrees hotter!   Today we took Christian and Trinity school shopping! Lordy, lordy what an adventure! Guess what? The peace sign is back and the kids love it! Funny how we keep going back to the good old days! Tie Dye T's with the peace sign!!

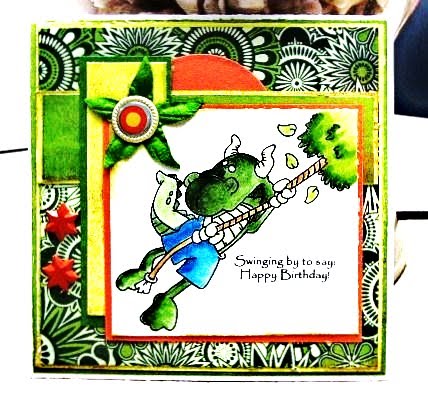
      This is a card I made before we left home for a sketch on Craft Alley and the prize is an adorable stamp image name Lottie from the Greeting Farm.   My image on the card is a dragon from Dustin Pike. This is the second card I have made using one of his dragons for my grandson's birthdays! I just love them and Dustin has a wide assortment of really cute images!
      Lousy picture!


      Craft Alley: Sketch
       Greeting Farm rubber stamp: Lottie! Is she not adorable. Of course I am going after this one!  I only had two stars though!
      • Copics:
        • G04, G03, G00, G000
        • B04, B02, B00, B000
        • E50, E51, E53 
      • Sorry everything else is from my stash.
      Be safe!

        Tuesday, August 17, 2010

        Congratulations to Elisabeth Bell Digi DT!

        Hello everyone!! Well, as you know I applied to the Elisabeth Bell DT call and was chosen to be a guest designer for September and October! What an honor to say the least!  The following 8 were chosen for  EB Digi DT! Congratulations ladies!
        1. Janiel Corley
        2. Lilian Tan
        3. Patricia Soldenhoff
        4. Lynda Nielsen
        5. Jodi Ann Lee
        6. Tracy Valure
        7. Lisa Futch
        8. Wendy Ramlakhan
        Guest Designers for September and October!
        1. Colleen Holmes (me!)
        2. Lydia Bancroft
        3. Lori Ng 
        4. Crystal Irwin
        5. Angelique Nederpel
        Good luck  DT and GDT and can't wait to work along side of you!

        We are on vacation in Vero Beach and can't believe this is our fourth day! Trinity and Christian, grandchildren are keeping us quite busy! On Saturday we will leave to go to Orlando and will see our granddaughters Abby and Olivia!  We have managed to see and spend time with 8/10 grandchildren within a month! Gosh, that makes me sound old!! I was five when I had my first child!!

        Have a wonderful day everyone!! I have one card to post this week!

        Wednesday, August 11, 2010

        Wednesday

        Hello!!! Hey can someone please turn off the fast forward! Where did the summer go? Gosh,  I have too much to do before Friday and it's coming rather quickly too! I am so looking forward to this vacation! Can't wait and yet I have a ton to do!!! Sound familiar!

        Today I colored a Elizabeth ODulemba image. Have you ever been to her site? If not you are missing out on super great digi's and guess what? They're free! Yes, you read that correctly she posts her digi's for everyone to enjoy. Elizabeth is an illustrator and author for children books. Her talent is utterly amazing and she loves what she does and shares her talent with everyone! If you are buying children books...I recommend her books and those she illustrates and they are on her blog! I made this card for a student at my husbands place of work, who is leaving to attend law school...well, we know how many books he will be carrying around! I love this paper!!

        Supplies:
        • DP: DCWV; Natural ....this paper is beautiful and has lots of browns, perfect for male cards. I love it!
        • Prima Pearls:  you can buy them here at SCACD. 
        • Stamp: stash ...acrylic
        • Copic markers
          • mouse: C05, C03, C01, C00
          • Green: G07, G05, G03, G00.
          • Red:  R29, R24, R21
          • Blue: B05, B02, B01, B000
          • Brown: E07, E04, E13, E11
          • Diamond Glaze on the glasses. 
          • Gold: YR24, Y11, Y05, Y00
        Challenges:
        Tip of the day:  Bows! Do you have trouble making bows? Don't feel alone...I can't either and use Bow Easy. This gadget is only $5.00 and will save you oodles of frustrations trying to get that perfect bow. Your bow is perfect every single time you use it. It makes 7 different sizes: 3/4", 1 1/4", 1 3/8", 2 3/8 and 2 3/4". You can purchase it at SCACD  .   Suzanne Dean made a great video on how to tie the bow with the Bow Easy and is a must have for me!!

        Saturday, August 7, 2010

        Correcting Copic Mistake

        Hello dear friends! Is it a good weekend so far? Mine has been okay, not the greatest and surely not the worst! I did go to the pool for awhile and  read more of my book "Blood Games" which is a goodie! Irish Johansen is the author and most of her books are mysteries and really intrigue me.  I love good mysteries to the point  me and my hubby have gone to Mystery Dinners, Mystery Train rides and even a mystery weekends which were lots of fun.We arrived on Friday night at a hotel in PA. The hotel is very old and has kept the decor to the era it was built. It has the old heavy doors to the rooms, Carve stairways, dark beautiful wood and you transfer back in time the moment you enter it.  Shortly after we arrived we were invited to have cocktails with the rest of the guest and while we were socializing, a man runs in with a gun and shoots and killed the guest who we were talking with! YIKES  However, when the police went to the killers room, they found him dead in the the shower with a bullet to his head. Blood is splattered all over the walls, broken shower door that was hanging lopsidedly from the frame and lots of other goodies! Yep, we went and inspected it looking for clues! You spend the rest of the weekend trying to figure out "who dunnit" lots of fun!!

        TIP of the day! There are many ways you can correct your mistakes when coloring with Copics. One of course is using the colorless blender. Yet, sometimes it does not remove all the color and this is when I take my white  highlighter pen and carefully go over the spots I couldn't remove the color. I also use it to cover any place where I may have gone out of the lines.  My last resort is to paper piece it. What is paper piecing?  It is when you stamp your image again and cut from it the part you need to cover up your mistakes.  Clear as mud right?? LOL Here is a video by Gina K who really describes and shows  you how to paper piece.  In the video she not only demonstrates how to paper piece, but how you can do it with pattern paper! Much easier to comprehend watching instead of reading about it!

        See you tomorrow!

        Thursday, August 5, 2010

        Happy Thursday!

        Hello there!!  8 more days until we hit the beaches of Florida!! My DH is a true Floridian and two of our children and their families live in Orlando.  I lived there for five years and I went to Disney twice...no lie!  The first time I was visiting my daughter, Amy who lived in Hilton Head and and I in Michigan at the time.  Hurricane Fran was on her way and they were evacuating the island. So we got in the car and headed south to Orlando! We had very little money for things were sorta tough during this time in my life, and so every morning we would go to those horrible time share programs so we could get free tickets to the parks!! Well, I was never to Disney so that was the first park I picked. Let me tell ya...that daughter of mine wore my butt out that day! Amy is 6 ft and I am 5 ft and trust me most of her height is in her legs and she was on a mission to show me the whole park in one day!! Needless to say...95% of the time I felt like I was running to keep up with her and then my purse was stolen while we watch one of the shows. LOL to make a long story very short....Disney gave 2  no limit meal vouchers at their finest restaurant. We ate like PIGS!!! We chose the most expensive 7 course meal they had. I will never forget how dang sick we were when we walked out of there!! You could not pay me enough to eat as much food as we did that day. It hurts thinking about it!!

         (Tip of the day will be after pictures of my card)


        Challenges:


        Do you love her like I do? Is this you for it surely is me!! Except kids got replaced with grandchildren! My image is a Sarah K! I love her stamps. If I had to put my favorite stamps in order of which ones I like best...Sarah K would be tied with Elisabeth Bell for the number one position! And of course 7 Kids College Fund is one of my all time craft store! I could spend all day just looking at everything and then it's I want this and I want that and very hard to decide what you want and what you should only get!! KWIM

        Supplies:
        • Cryogen White paper... Love, love this paper for coloring with Copics. It has a bit of a tooth to it and so easy to blend your colors with.   It blends faster with less ink and has sparkly specks in it. So pretty!
        • Sarah K image: 
        • Copics:
          • Pink: RV09, RV06, RV04, RV02
          • Skin: E11, E00, E000 R20 for blush
          • Apron: C01, C00
          • Shoes: W3, W01, W00
          • Broom: E49, E47, E44, E42
          • Pockets, Kitty Cat, Bottom Shadow: C03, C01, C00
        • Paper: sorry stack
        • Prima Flower
        • Magic Mesh which is self sticking and you can buy it here at SCACD
        TIP OF THE DAY: Another awesome punch.  Deep Edge Doily Lace Trim by  Martha Stewart and I love it. When you want to make a ribbon with regular border punches you punch one side, turn it around and punch the other side. Not with this one!! It does everything for you and you can get at Create For Less. 
        I used it on my card today!


         Thank you for your kind comments!


        Wednesday, August 4, 2010

        OWH.... Operation Write Home

        Happy Wednesday everyone! Please bear with me, and grab a cup of coffee, for this is a super long post.  As many of you know I  love and appreciate our troops and the their love ones who are left behind at home. I belong to a group called OWH which stands for Operation Writing Home. Their mission is supporting our nation's armed forces by sending blank handmade greeting cards to write home on, as well as cards of gratitude to encourage them. As of August 2, 2010:   497,071 cards have been sent to deployed heroes!! Tell me that isn't awesome!!  I have a girlfriend, Lisa, The Purple Place, who mailed  42 cards yesterday!! YEA Lisa and thank you!!   Jan Hunnicutt started an OWH group over at Simple Scrapping Crafts  and asked me if I could make a card for the challenge today!  I felt extremely honored she asked! Right now OWH is having an all month Birthday Bash, across the nation to celebrate their September 12, birthday! It is an awesome celebration and I am hoping we can all join in one way or another. All the details are here.  Before I post my card I would like you to read a letter sent recently to OWH and I copied it from here. It is written by a wife of a Sgt. deployed to Afghanistan.
        ______
        Thank you so very much for the wonderful creation of cards that you have made and sent to our troops overseas. I have been the lucky recipient of several beautiful cards that my husband sent home to me from Afghanistan. If I could send you all the joy you have helped in creating by such a gift as this, you would know how truly grateful I am for your efforts. Thank you's don't seem strong enough to express my deepest feelings as to what they bring to my life. I know this sounds overly dramatic and I do ask you pardon for such poetic license in this as I will explain a little in the hope you all will understand, as I don't know if you have or had loved ones who have served in uniform but to me these little treasure are a blessing.

        I am a Proud Marine wife and madly in love with my husband GySgt H.R. currently on a 12 month deployment to Afghanistan. We are stationed at MCAGCC (Marine Corps. Air Ground Combat Center) Twentynine Palms, CA. I moved out here in August of 09 just in time to watch my husband deploy that September, we are counting down the days till he will finally be home and we hope not to deploy again for a year (if we are lucky). Between the both of us we have 5 very strong children who are greatly missing their father right now. We have dealt with the 6 and the occasional 9 month deployments but, this is our first full 12 month cycle. Through out this deployment my husband has had very few times to call home and for the most part communications leaving the base are left to a 15 min phone call also, with the job he does (infantry) he is constantly busy focusing on his job as it should be and when he can he will write a quick note to everyone before he is off again doing what he must. There have been weeks that have gone by that I haven't heard from him, though I am grateful as we live in the technical era where phones, emails and texts exist the fact that I can get a word on his well being with in moments is a true blessing but, I have to say I have it easy as the wives before me would wait months to hear how their loved one was so, I am truly thankful.

        The first card I received was 3 months into this deployment and now I will get one about 1 or 2 monthly. These cards are a welcome gift, truly they are as it allows him to express his thoughts when he feels the impulse to do so allowing me to know im still tucked safely in his heart as he is in mine. I check the mail and find these wonderful cards and I am all aglow telling all that can hear that My husband is the Bomb ..lol and you are all angels. It has been close to 2 weeks now since I last heard from My Henry and wouldn't you know it, there were 4 cards sitting in the mailbox with loving words from a man, stuck in the heat, surrounded by dirty, smelly marines but he took the time to write me and tell me how much he misses and loves me and our children..

        I wanted you to know you have had a hand in keeping us all connected, when words fail us, you have given us a way to get it across so not a moment is lost even when they are so far from us. You not only helped him send his love home but made my day a lot less heavy with worries that can be hard to bare. Thank you and Much Awesome respect to all who have taken the time to participate in this cause.

        Sincerely,

        Mrs. R.M.R. 
        ________


        I have read this letter three times and each time the tears still fall down my cheeks.  Please go to the OWH OWH group at Simple Scrapping or the OWH website and see if you can help with their cause. We make so many cards for the challenges ...lets put them to good use! Those who do not craft they would be more then grateful for donations to help fray the cost of shipping.

        There is one rule in making cards for the deploy and it is no glitter on the cards. A tiny spec of glitter makes a man or woman visible with night vision goggles, this is a risk no one wants to take. On OWH website it does say you can use Stickles. However, I choose not to use anything with glitter. I won't even make my cards at my usual place in fear a flec of glitter would adhere to it.

        Thank you for taking the time to read this:

        My Image today is from Karen Doodles.  Let me tell ya,  I love her images and use them a lot!! If you never been to her site take a quick hop over. I am sure you will be impress!!  I love my card and there isn't one spec of glitter on it!


        Tuesday, August 3, 2010

        Party Time Tuesday!

        Good morning fellow bloggers!   You know every week I brag about doing Party Time Tuesdays challenge blog. This week I was asked to be the weeks guest DT...  Is that not awesome? I couldn't say "yes" fast enough!  I love this blog for every week, no matter what the challenge is your card must have a birthday greeting on it! Good way to build up your stash ladies!

        TIP OF THE DAY: I was asked how I was able to have my cards and blog transferred to Facebook when I do my blogging. Here is the web site to join and you too can have your info transferred to FaceBook right from your blog page!

        If you did not see the tutorial I did on the Fiskar Punch look one blog below. I love this punch! Can ya tell?

        Today's card for PTT is an easel card! I used Sweet Messenger digital stamp from BDS. Isn't she a sweetie. I felled in love the second I saw her. Copic lessons are given by Lisa Futch at  Simple Scrapping Crafts 
        and this weeks lesson is on coloring whites. If you are looking for a blog with lots of friendly people, challenges of all kinds, lots of inspiration, lessons,  and everything else on a blog...then you need to go to Simple Scrappy Crafts for it's all right there!

         These are surely not the best pictures I have taken.


        Thank you for stopping by. I read all comments and appreciate you taking the time to leave pne!

        Friday, July 30, 2010

        Friday tutorial.

        Hello dear friends on this beautiful Friday night!

        Lots of info below!

        TIP OF THE DAY! Fisker Punches. I used my new punch  today called: Craft Punch, Border Corner, Quilted Corners! My card below was made using  it. This is the most awesome punch I have ever used. It goes around the complete page, the corners are quilted and it is as easy as pie. So easy to line your paper...I could teach my young grandchildren to use it.

        The punch has two levers. One for the corners and another for the border. See the ridges to the left of the levers.
        Place your paper under both levers.


        slide you paper to the next  ridge and only push the border lever

        4 x 4 you only punch the border one time.   5 x 5  two times.  Turn your paper to the next corner and punch both levers.
        Continue until completed
        Isn't it beautiful? No guessing, measuring, perfect alignment. See my card below!

        I was requested to make a 50th wedding anniversary card and this is what I came up with. I love it and taught myself some more things! Like you need special tape for Velum because reg tape or glue shows right through it. 
        Layers: White card stock, gold foil paper, white card stock with fiskar border punch and embossed with Cuttlebug. A gold doily and computer generated sentiment on gloss paper and dry embossed.  Flowers were purchased at Michales Craft store in the wedding department and I took them apart. See pictures below again!
          Finally the end!!! Hope you love it like I do!

        It's Friday!

        Happy Friday everyone!  Ok, where did July go...I lost it somewhere? Talking about losing things, I have to tell you what happened the other day.


        This might be one of those stories you had to be here to appreciate the humor! Any how...when I gained so much weight on prednisone, I had to have my rings re-sized larger. Unfortunately,  when we had it done I was very edematous (swollen) all over including my fingers and so the rings were made to big. They will actually fly off of my fingers when not swollen so I take them off all the time.  Sunday we were getting ready to go out and I went to my jewelry box on the dresser to get my rings and they weren't there and I distinctly remember putting them there!! I looked in the jewelry stand and they weren't there either. I checked the night stand, bathroom, desk and I am getting worried so I asked DH if he saw them. Now he is looking for them too! We are looking in the same places at the same time for about 15 -20 minutes, we were starting to run late for an appointment and I said "let's go and when we get home I will call Amy and see if I left them there" meanwhile if I did ...Amy would have called me immediately. As I am closing the lid to the jewelry box I happened to look at my fricken hand and there were the rings on my finger!!!! I hold my hand up for DH to see...he looks at my hand, we looked at each and cracked-up big time!  Now that is bad!

        This cute and silly birthday card is using  Karen's Doodles digi image. I love silly images  on birthday cards for they make people smile! Isn't it bright and cheerful? It's for a man so I ditched the flowers this time!


        • DP: Basic Grey
        •  Brads: Basic Grey
        • Copic Markers
          • Elephant: C00, C01, C03
          • Rouge: R20
          • Skirt: G07, G05, G03, G02
        I cut my paper with Paper Cow paper cutter which I will tell you about more tomorrow!

        Wednesday, July 28, 2010

        Friend

        Hello!! Wishing this finds everyone in great spirits and health! Today was an awesome day for me! Hubby took my box of cards to work and sold 5 and orders for 4 more!! Nine cards on the very first day they were shown!! I'll tell ya that sure made my day, no my week, how about the entire year! Oh my gosh I am just so thrilled!


        Tip of the day! Ok, you purchased all the Copic Markers you wanted! Guess what? It is not over for your markers are eventually going to run out of ink. Yes, they last a very long time however, when one goes dry be prepared for several more will follow. When ordering your first Various Inks which is what the refills are called and you color using shading from dark to light or light to dark, you only need to order the lightest and medium color refills first. Think about it. You only use a small amount of the dark color to your image. It is the lighter and medium colors you blend with or use more of on your images. My light and medium colors went dry and after a year of constant coloring, I have only refilled two markers, R29 and 39 which I used a lot of last Christmas...ya know Santa!


        Never open a new or a refilled marker over your image. I have forced myself to make it a habit of not opening any markers over my images. Suzanna Dean warned me about this and I did not listen for it never happened to me until....I was doing a very detailed card and my marker went dry and I refilled it. Without thinking I opened it over the image and it splattered enough to ruin the entire project. It also happened when I opened a dark marker for the very first time. UGH, I was so angry with myself.

        Tuesday, July 27, 2010

        I am Home!

        Hello friends!! Did you miss me like I missed you? Two and half weeks with no crafting...yikes and since I have come home, I keep looking for my mojo and can't find it! We had a beautiful vacation with our grandsons until the last two day when I developed food poisoning. Let me tell ya, I was so sick, it was horrible. I never, ever want that again. It is horrible and if you have it you know it. You are so dang sick.

        My granddaughter, Abbie had a tonsillectomy after we returned and thank goodness, I was well enough to travel so I could be with her and my daughter, Amy in PA. Tyler and Travis grandmother and grandfather met me there and took the boys to Michigan. They live in Las Vegas and each summer spend time with both of their grandparents!  When I came home from Amy's,  I rolled up into a ball and my body just quit, it said "no more!"  I agreed too!  Good news: Abbie did great and was a real trouper. She is still recovering and each day gets better! Yahoo!

        TIP OF THE DAY:  Have you ever used Stickles? Stickles is glitter glue with an easy flow tip made for paper products. There are very few cards I have not used Stickles on. I love it and it really gives your cards a finish, professional, glittery look! I have discovered you can not use Stickles on digital images printed on Cryogen paper. It makes the lines bleed.  So when ever you are using Stickles for the first time on a new paper, ink, etc. test it first to prevent heartache in the end.  Stickles is the last thing I use and ruined two beautiful cards today with it. It was a real bummer! Esp. with my mojo hiding on me!

        This cute card "Dogs Day Afternoon"  from Karen Doodles! was fun to color! I was commissioned to make this card by one of my hubby's co-workers. This is the first card I have made for her and she picked this image out of the ones she saw.  I wanted to make a flowery,  oh my gosh, dead drop gorgeous card and yet it's a dog! I love this image, but you can't flower him all up!! Can you? LOL  Anyhow, doesn't he just make you wish you were the one on the beach with a cool drink in your hands! I know I do!! I found the beach umbrella by doing a google search for umbrella's and printed Happy Birthday on it! Easy peasy in Microsoft word! I put diamond glaze on his sunglasses and drink to make them shine. Diamond  Stickles on the sand to make it glittery. After I was done coloring the fur I applied colorless blender with an old wash clothe to give it a more texture look.  I love the end result! LOL in this picture it looks like a cigarette hanging from his lips!! It's a straw!  Maybe I should add some color to it!!!

        Challenge: Party Time Tuesdays   This is fun challenge held every Tuesday. Decides the recipe you need to have a birthday sentiment on your card.  Let me tell ya it is super nice when you need a birthday card and you have one right there already made!

        Supplies:

        • Digi: Karen Doodles "Dog Day Afternoon"  Don't you just love it!
        • DP: Basic Grey
        • Nestability Scallop Oval
        • Flowers: Prima
        • Sentiment: Computer
        • Ribbon: Ofry
        • Diamond Glaze
        • Diamond Stickles
        • Copic markers:
          • Fur: E49, E47, E44, E35, E25, E31...Yep, I used all of them!
          • Scarf and hat: YG25, YG,23, YG,21
          • Chaise lounge: YG25, YG23, G20, Y06, Y02, Y00
          • Glasses: Prismacolor pencil
        Thank you for stopping by and please leave some love...today I can use all I can get! LOL

        Sunday, July 11, 2010

        Black and White

        Hello and how did your weekend go?  Hubby and grandsons, Tyler and Travis went to the Smithsonian today! The boys sound tired and no wonder for last night they monkey around until 3 am.  I tried to tell them "your going to be sorry tomorrow" and I think today they KWIM!  They are 12 and soon to be 9. Tyler, the eldest cracked me up when they first came! I said "wow, you sure grew" his response was "I am starting to grow a mustache!"  I looked at his face "I don't think so yet"...he practically pulled me into the bathroom to show me in the mirror! It was so dang cute as he pulls the skin out from his face and says "now look"  and ah hah, if you look super close and imagine, you will see it!  I dearly love all the grands and they keep my life jolly!  Tomorrow we leave for Williamsburg!! YEAH, WaHOO and this will be my last card for two weeks!! I am taking my Copic's and images to color but, that's all! Bush Gardens here we come!

        Tip of the day: 

           Coloring with REDS. So many have said that when they color with reds it bleeds out of the lines or their paper becomes tacky and streaky. There are several things that might be happening here and these are some tip you can try.
        • Your paper:  Try a different paper. Gina K is a very hard smooth paper and the ink does not absorb into the paper and will lay on top. So when you are trying to blend you keep going over and over it and eventually the ink has no where to go and as it dries becomes tacky and streaky or bleeds out. You can use a  more absorbent paper such as One Sheet Wonder or Cryogen. However, remember it will not blend the same. Each paper blends differently. If you can't change the paper then change your technique.
        • Letting the paper dry between coats. Let it dry a little...not completely or you will have to add more ink to get it wet again to blend. The paper can only hold so much ink at one time so if you allow it to dry it will accept the color without bleeding. 
        • Don't use as much ink. If you color making little circles, try feather blending. This is how I color with all my colors.  The way paper is made today you do not need to soak it to blend it. I was using more ink by coloring in small circle and you need to.
        • Avoid the color up to the edge. If your reds are bleeding, don't color up to the edge. I start with my darkest colors first. With darker colors R27-R29 or R35- R39 or the dark blues, I do not color to the edge. I will finish blending my medium and light colors and then look to see if the ink spread to the edges. If it has not, I apply a very light touch tip to paper and fill in what was not colored. Using a very light touch you should not have to re-blend.

        Leaving on vacation tomorrow I wanted to make a card with less fuss. I love the ways this card turned out! I made a 4.25 by 5.5 card using white card stock as my base.  I laid down my second paper which is the black with white dots. White card stock and cut out corners with Cuttlebug die. Cut blocks at 1.5 x 2.25 inches. I printed out a digital butterfly in 3 different sizes and layered them. I love this technique for butterflies! Added black and white Prima flowers to the corners! Black and white leaves with Martha Stewart leaf punch. Don't you just love it the look! Sometimes less is more!

        Challenge Flutter Fly Wednesdays and this week is open. Danni started this site and it is growing by leaps and bounds! I love it and if you like using angels, fairies or butterflies this is where you want to be!!

         Operation White House four squares. If you want to know what to do with your cards you have in the box...send them to Operation White House and they will be shipped to our troops who are deployed to use to send back home. Or thank you card for them to keeping us free!!

        DP: Craft Secrets. Love their paper pads

        I will have my laptop and will be able to blog! Thank you for stopping by!! Be safe!

        Saturday, July 10, 2010

        Happy Friday! Christmas in July!

        Hello everyone!  Today was the beginning of our vacation.To make a long story short my hubby was in a vehicle accident today. He is fine, the Tribecca is demolished. It happened when a fire truck was approaching from the other direction and the truck in front of him slammed on their breaks and our SUV went underneath. It happened in PA 3 hours from home. The SUV is new, but can be replaced... he can't ...so all is good! 

        Tips of the day:  When placing flowers on your cards, use different color leaves to emphasized your card colors. On today's card I used white leaves which made the corner look brighter and matched the paper!    Small tight places like the bottom of Rudolph legs,  I color with Prima Color Pencils, it's so much easier and faster!

        Santa and Friends, is part of the The Winter Wonderland Collection made exclusively for Susana Custom Art and Card Design! I just love this santa! His beard, cap and bottom of his coat has Doddle Bug white flock applied thickly and  Polar White Flower Soft for the snow. I cut away the gift boxes and added my own. The Color Combo at Simply Scrapping Crafts asks for Red, White, Blue and Brown.  The challenge at Follow Your Heart  wants faux or sewing on your card. Well, it didn't take an Einstein to know which one I would choose! Santa and Friends were faux!!! I love Santa and Rudolph, but I can still wait a bit for winter!!


        Supplies: 
        •  DP: Basic Grey
        • Cryogen: for Santa
        • Copics:
          • Santa Suit R32, R35, R37, R39
          • Skin: E11, E01, E000 Blush R20, R32
          • Boots and Belt: C7, C5, C3, C1
          • Rudulph: E17, E15, E11
          • Chipmunk E27, E25, E21
          • Eyes: B21
        • Pointsetta: Stash
        • White Leaves: Martha Stewart leaf punch
        • Scallop Oval Nestabilitie die
        • White marker: Sharpie Poster Paint, Extra Fine Point
        Have a jolly weekend!

        Tuesday, July 6, 2010

        Simba and Bailey.

        Hello and Happy Tuesday!! Did you have a great weekend and a chance to sit and relax? Hard returning to work today. I can't blame you either for it is gorgeous outside! Those who live in the eastern states, can you believe it's 97 with NO humidity! Awesome!


        Today is TIOT Challenge for Susana's Custom Art & Card Design,  and the challenge is a sketch posted on the store's blog HERE! 
        I chose   "Puppy Love" from the Hearts and Hugs, Summer Collection by Victoria Case made exclusively for SCACD!  If you follow my blog you will know I love dogs and when I saw this stamp I had to have it! My dogs, Simba and Bailey are Havanese brothers from the same litter and are 2 1/2 years old.

        I made a little video when they were about 4 months old and you can watch it here! It's not very long and I hope you like it!

        Isn't this card adorable? I had a lot of fun with it. I changed the sign on the front of the box which said "take me home" to "friends!"
        Recipe:
        •  Stamp
        • DP: Basic Grey, Porcelain Paper Pad
        • Nestabilities Circle Punch
        • Martha Steward Border Punch
        • Cuttle Bug dry embossing folder
        • Sentiment: Stash 
        • Distress Ink: Tim Holtz, Shabby Shutters
        • Copic Markers:
          • Blouse: R85, R83, R81
          • Pants: YG25. YG23, YG21
          • Dogs, E27, E25, E21 and C00, C01, C03
          • Hair: E25, E31, E50..I love this combo and here is a link to it!  Video by Suzanne Dean
          • Diamond Glaze to her eyes to make them shine
          • Stickles: Diamond to shoes and her top! 
          • Thank you for looking and hope you enjoy the video of my dogs and hair coloring by SD!

        Sunday, July 4, 2010

        Happy Fourth of July!

        Hope everyone had a splendid day with your family! Wasn't the weather just beautiful with sunny skies, no humidity and a little bit of a breeze! We were going to go to Washington DC to see the fireworks and everyone talked me out of it. They said it is so crowded your arms are pinned to your sides. YUCK! No, thank you, I like moving my arms and legs!! So what did we do? We stayed home and hubby finished the deck that was started 3 years ago! I am not complaining for that made me a happy camper!

        Tip of the day: What paper should you use with Copic Markers? I have found through horrible experiences the paper you use makes a difference with your coloring. For over six months I struggle with my inks becoming tacky and streaky. I even went to Maryann Walker, Copic's Product Specialist for answers and tried every trick in the book.. I even took all my Copic's apart and soak the tips in Colorless Blender solution or I replaced them. Since I was using the top of the line paper, no one thought to tell me to try another brand.

        Top 3 papers used in the States.
        • Gina K 120 lb Luxury Paper:.  Heavy, smooth paper
        • One Sheet Wonder by Couture Cardstock:  Heavy paper, but not as tightly woven as Gina K.
        • Cryogen Irredescent or white Cardstock:  I love this paper! It is smooth with a little bit of tooth to it. You only need to touch it very lightly to apply color, it blends well, has a glittery sheen  when you tip it in the light. Using the colorless blender pen, you can remove any mistake, including red ink on Cryogen. My colors never streak or get tacky since I switched.
        Elisabeth Bell designs  exclusive stamp lines for Susana's Custom Art and Card Design and  I used "Heartstrings" from the Sampler Edition 3 line! This stamp is one of my favorites!!! Isn't she adorable! She looks so dainty and I love her hair and dress!
        Supplies
        • DP: Crafty Sisters
        • Scrolls: Sizzix Dies
        • Ribbon: Offray
        • Roses: Prima
        • Flower soft on bird house
        • Leaves: Martha Stewart Leaf Punch
        • Heart Charm:  Blue Moon Charms can be purchase at  SCACD
        • Stickles: Ruby Slippers and X-mas Red
        • Pearls: Stash
        • Copics
          • Dress: R39, R37, R35, R32
          • Bird House: G000, G00, G02
          • White: C0, C1
          • Skin: E11, E01, E000
        Thank you for looking and commenting! It makes me smile BIG time!
        If you have any questions about anything with making cards please ask and if I don't know the answer I will find it!


        Friday, July 2, 2010

        Teddy Bear Wedding!

        Hello my friends and those who live in the states are you ready for your 3 day week-end? My hubby is thrilled!! We don't have anything planned. On Wednesday,  My daughter, Amy and her two children, Abbie and Andrew came and stayed overnight.   It was great seeing them and gosh they are growing so fast! Abbie's hair is past her shoulders and she looks so pretty with her braided pig tails.  She will tell you  "I am  leaving my hair grow really long, so I can give it to a sick kid"  She wants to donate her hair, so a wig can be made for a child!  Is that not awesome for a four year old to say and do? I tell ya...I am so proud of her!

        Since it is summer and I love Teddy Bears! I am presenting to you a Teddy Bear Wedding! I just love this stamp and it's been a long time since I have used it. The challenge this week at  Teddy-stampers  is "Love My Teddy" and nothing says love like a wedding!

        Tip of the day:  Copic's When coloring with Copic's and your final piece ends up with no real highlights or shadowing, there are several ways to correct to it so you  have more of a 3 D look.  If you are using light colors for ex:Y06, Y04, Y02, Y00. Darken you dark area again and blend without taking your lighter colors over the dark area. If you still want more of a 3 D look...take Y08 and go over what you were coloring withY06 and skip using the Y04 when you re-blend it.. If you are using the darker reds or blues for example: B39, B37, B34, B32 and your area is too dark with no highlight. Take your colorless blender and using the side of it...not the tip and slowly and lightly go over your light area. Let it dry and repeat until you have it light enough. However, at this point you might notice some uneven coloring. Take B32, using the side of the marker and not the tip and go over the light area again.
         
        I used Stickles, Ruby Slippers on her head piece, flowers and corsage. I love this color. It is much thicker  like Frosted Lace and easier to make 3D effects!


        Supplies:
        • Rubber Stamp:  E-bay special
        • Ribbon: Stash
        • Bow Easy
        • Copic markers
          • First Bear: E37, E35, E 33, E31,
          • Second Bear:E79, E77, E74, E71
          • Shadowing the white: C00, C01
          • Red: R39, R35, R32
          • Green: G25,  G23, G21
        • Stickles: Ruby Slippers
        • Sentiment: Computer generated
        Happy Weekend!! Thank you for looking!

          Time of day

          Kostenlose Uhr fur die Homepage clock for blog

          LinkWithin

          Related Posts Plugin for WordPress, Blogger...