Welcome to Simply Scrapping Crafts First Annual Holiday Hop!
We have quite a line-up for you today filled with lots of holiday inspired goodies! The DT has been busy working in Santa’s workshop creating a sled full of gorgeous holiday projects to help you decorate, scrapbook or use for gifts!. Be sure to comment on all of the blogs along the way because we have "hidden" some extra special treats for you. There is no way to tell where we have them stashed, so be sure not to miss out! Some of our hop hosts are giving an extra entry for becoming a follower. Who doesn't appreciate more chances to win right?
All winner will be announced on Tuesday, December 7th, 2010 via the DT blogs and also in the hop room at SSC, You have until 11:59PM EST tonight, December 4th, 2010 to comment for your chance to win. All you need to do is click on each link and leave a comment as you hop along to the end of the list. Are you ready for a Holly Jolly Holiday Hop? Let's get to hoppin'!
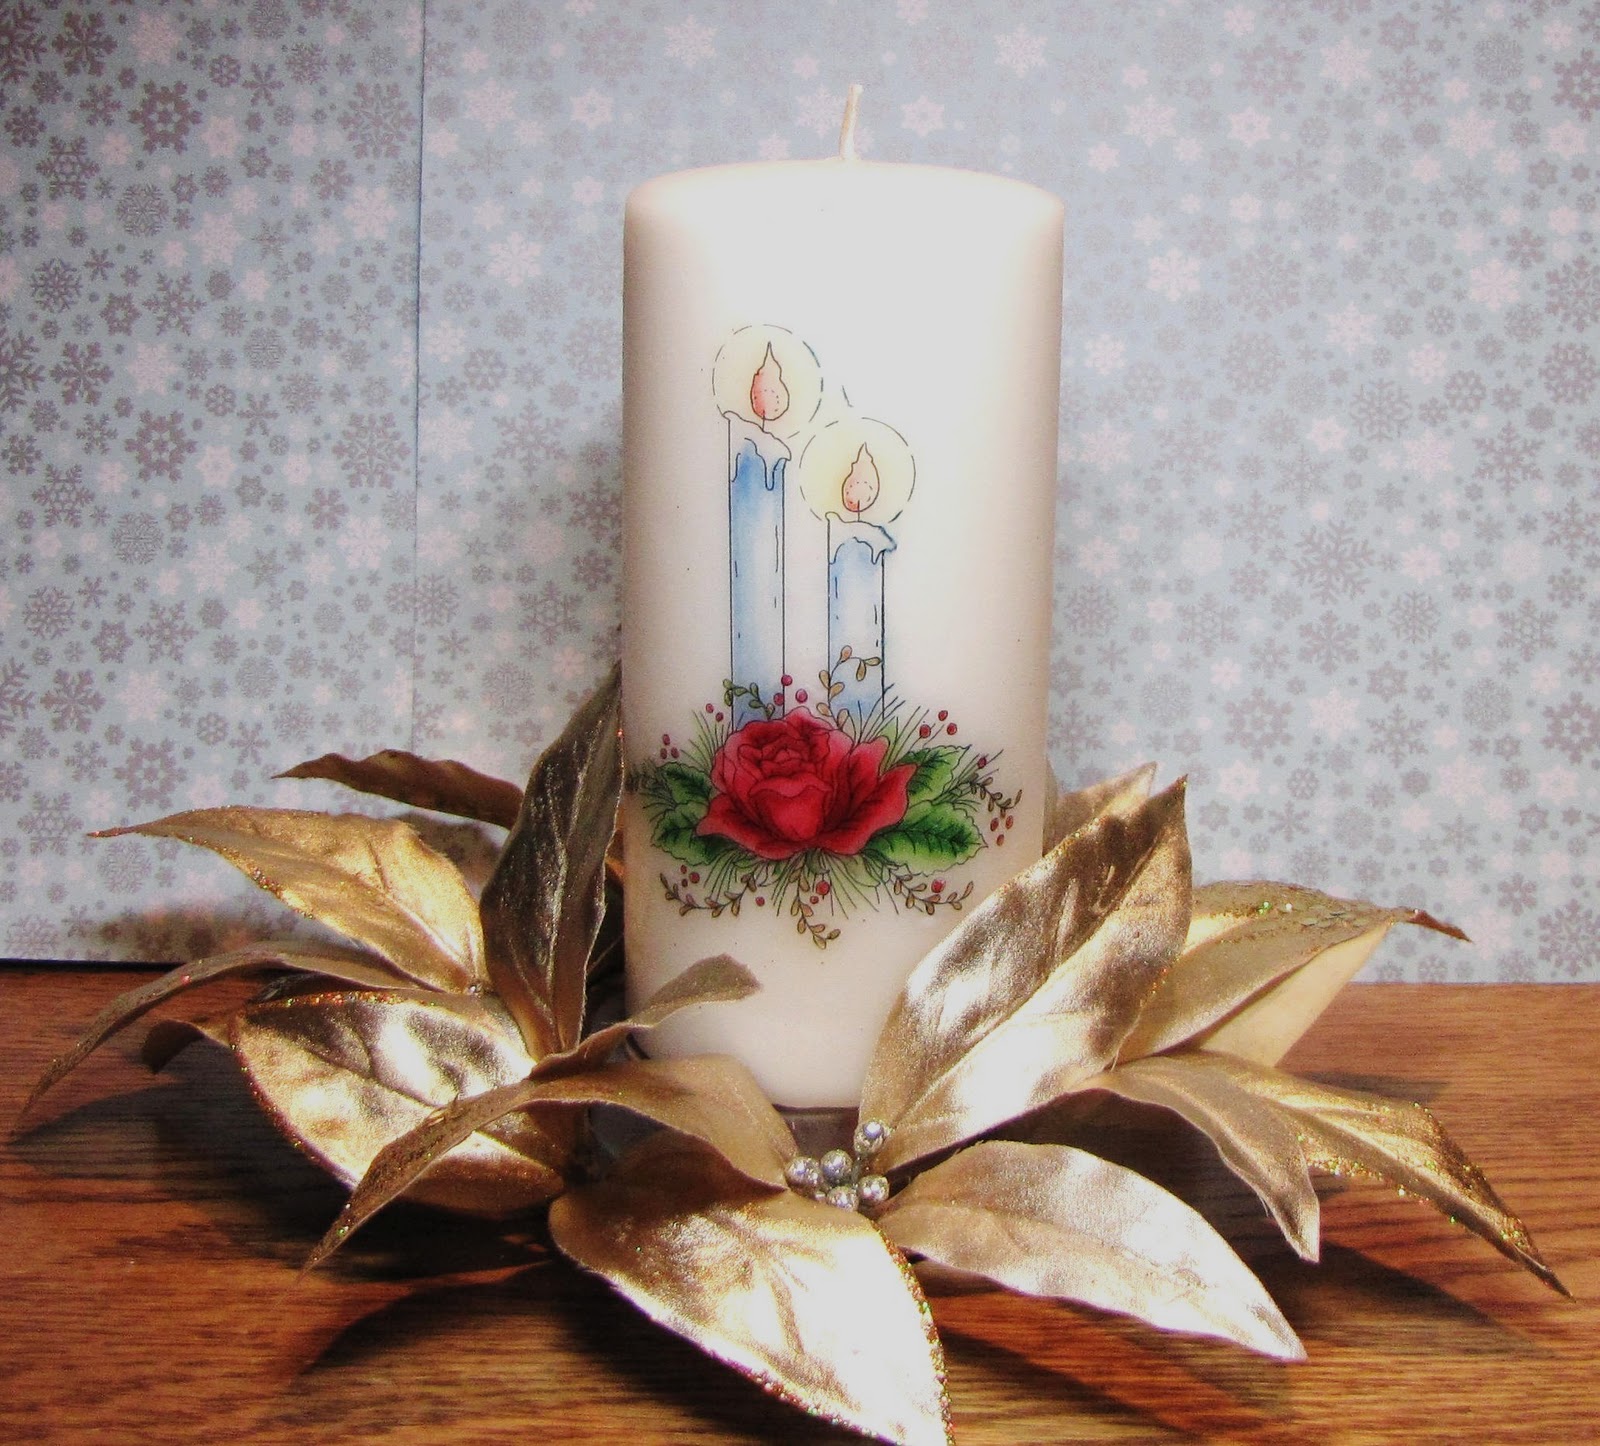
I chose to do a tutorial on melting a digital colored image onto a candle.

Easy Peasy!

Glue corners of tissue paper onto card stock to print the digital image.

This is what your digital image looks like on the tissue paper
Photo is kinda bright wouldn't you say! The photo's were taken at night ....sorry
Photo is kinda bright wouldn't you say! The photo's were taken at night ....sorry

Colored your image with your favorite medium. I used Copics. You are unable to blend like you do on regular paper, however, as you can see you still get great variations. Place something under the tissue paper to catch the ink for it goes through the tissue paper quite easily.

This is a picture to show you how much ink went through the tissue paper.


Spit on the image!!! LOL I wet the tip of my finger and slightly moisten a few corners to help the tissue paper stick to the candle. You do not want to wet the black lines wet for they will bleed.


Use a heat gun to heat the wax paper. What will happen is the heat gun will melt the wax coating on the wax paper and seals your image. You want to keep moving the heat gun so you do not melt the candle. Don't put it as close as I have in the picture or it will melt for sure!. Heat until you see everything turn shiny. This will take several minutes to do.

The final results. Large candle 1.50...everything else I had.

Don't forget to leave a comment to be eligible for the drawing and you will have two chances if you become a follower or are a follower. Susanna from Susanna Custom Arts and Cards Design is helping to sponsor my blog on the hop. The lucky winner will win a $15.00 Gift Certificate for SCACD
You want to make sure you comment on all of the DT's blogs. The next blog you should go to is Amy's. If you were here first you want to go to the beginning of the hop and start at SSC or go straight to Maureen's blog.
GOOD LUCK!!!
Maureen http://stampandscrapwithmaureen.blogspot.com/
Theresa http://procrastinatingscrapper.blogspot.com/
Nikki http://gracie33.blogspot.com/
Rona http://scraprona.blogspot.com/
Colleen http://cardsdelight.blogspot.com/You are here
Amy http://amybeansblog.blogspot.com/
Clare http://bearydocardsinc.blogspot.com/
Pryn http://mochavation.blogspot.com/
Tammy http://tmaynard.blogspot.com/
Important notice: Please read it
I have noticed a comment left by: Anonymous. I cannot delete it without deleting everything. Please do not click on any of the web sites they have listed. I do not know who or where this person is from. It could very well be a lead to a virus. DO NOT CLICK ON ANY OF THE WEB ADDRESSES. I am sorry that people have to ruin things for us.
73 comments:
That Santa candle is so cute, what a great idea and seems so easy. Thanks for sharing with us. Merry CHRISTmas!
Love Ya,
Syd
Beautiful - the images looks so 3-d with your amazing coloring!! great idea!!
You ladies are hitting my crafty spot! All the wonderful ideas I have been wanting to try! I have a friend who makes her own candles and I have been wanting to get with her and try this project! Thanks for the awesome inspiration!
Wow, this is so clever. Thanks for the tutorial and the inspiration, now I also know how to get the pictures on candles!
Lovely gift idea. All I have to get is candles, the rest is already in the house!!
Woww wonderful!! Thanks for the tutorial!
Hugs Kristel
I really want to have a go at this
as it really looks effective
and is another reason for spending money on my copics.
feel another trip to the craftshop
for wax/tissue paper coming on.
Thank you for sharing.
Pat
Wow, this is a fantastic idea. I would have never guessed it to be so easy to make. I am going to share this with my daughter-in-law - she is obsessed with candles. I know what we will be making this week (LOL!) Awesome... thanks for sharing! AJ - aj_822@yahoo.com
Sorry for extra comment... forgot to say - You now have another Happy Follower! AJ - aj_822@yahoo.com
These are so awesome g/f!!! I really love the big one and I so have to try this. Your coloring on both of these is wonderful. Thank you so much for your awesome tutorial!! Hugs!!
I LOVE this, was wandering if you could use any type of markers!! Thank you so much for this tutorial!!
miller896042atbellsouth.net
Gorgeous, Collen! Just Gorgeous! Your directions are fantastic, too!
These candles are absolutely beautiful! I especially love the first one, so pretty. What wonderful ideas for those who love candles. Thanks for sharing. Hugs, Sandi
You make it look so easy. I love the santa candle. I became a follower.
I love this technique. The candles are lovely.
Colleen - I am totally impressed and have always wanted to try this technique. You made it look so easy, but I'm sure it's a lot of work!
The little Santa candle is my favorite and I think something I might be able to try. Now, I simply need to find some plain white candles?
I am also very excited to be taking part in the blog HOP and feel lucky that today is a not a bad day. I'm also taking everyone's advice and taking things slow and making one hope at a time.
It's been awesome to see the wonderful projects and I'm so happy I am playing and that it's going well!
You amaze me and I'm so blessed to call you my friend! :)
Hugs,
Lis
Those candles are gorgeous! I am definitely going to try this as a gift! Awesome inspiration!
Oh your candle is amazing I so want to try this.
oh my goodness, I was just talking with someone on another site about doing this with digis and we were going to look for a tut. I will have to direct her here!!! thanks for the wonderful directions! :)
Love the candles...I am going to try it!
I tried this technique many years ago. Thanks for reminding me of how gorgeous these look! Your Copic coloring is amazing!!
Love your candle. Thanks for the tutorial on how to do it....
Colleen, your candles are beautiful! I can't even wrap my head around using copics on tissue paper but yours make me want to try it! Thanks for your awesome inspiration as always!
Lovely - the candle is stunning.
Love the candle. I am going to have to try making one. Your directions are fantastic.
That was a great tip, must try this one day, maybe Mothers day
All I can say GF is WOW! Really original and beautiful.
You have encouraged me to try this project. Past efforts with this technique didn't turn out well! Pat
You have encouraged me to try this project. Past efforts with this technique didn't turn out well! Pat
What a terrific idea! Thank you for sharing that with us!
Thanks for the great tutorial! That Santa candle is just fab. I have become a follower
I love the candle idea! I have some plain pillars I was just going to tie a holiday bow around, but this idea is much better! Thanks so much for the great tutorial :)
I am sooooo glad you did this tutorial on putting digis on candles!! Thanks so much! I am now a follower, too!
could you use a regulas stamp also. using stazon. this is so orginal. love it...
Oh my goodness Colleen - I love your Christmas countdown at the top of your blog - how cute is that!!!
Loving that candle you made - what a great, creative idea! Thanks for sharing with all of us!
Big hugs!
Wow! What a brilliant idea. A simple yet classy gift. Thank you for sharing.
your candle is beautiful!
What a beautiful countdown picture at the top! And your candle is beautiful!
Great tutorial, Colleen! My bf says that your Santa candle is "the cutest candle [he's] ever seen!" :)
This looks like a fun technique!! Thanks for the tutorial .
I frequently need to use anonymous because I don't have a Google, Aim or other account. I am registered here -Barbara Jay
Thanks for showing us how to do the candles! They are so cute and you could make them for so many different occasions! (Love that Santa one!) Enjoying the blog hop!!
Oh Colleen, these are Amazing!!! Thanks for the inspiration, I have planned to make some candles as gifts and was going to do it my regular way....Stamping. Should give Digi way a try. Thanks again. Love your Candles.
What a beautiful candle! I am impressed! Thanks for sharing!
Thanks for that great tutorial. I've always wondered how to do this and you made it look so easy1
Just want to write, I am your new follower Colleen....Love your creations. Just some questions, what type of Tissue paper did you take to color with copics??? Can we burn the Candle??
Which Digi image is this?? Love it.
great tutorial. I'm a follower now, and as a bonus, I finally found someone with a Christmas countdown so that I knew which company to go to in order to get one for my blog! Thanks.
So beautiful!! I haven't made a candle in ages and didn't even think it would be possible with a digi! Cool!! you rock!
Colleen this is AMAZING!!!! Your candles both turned out beautifully!!! I can't wait to try this!
I too have someone that is always trying to spam one of my posts in particular. I have chosen to moderate comments and when the spammers try to get through, I chose the option of 'mark as spam' through Blogger. Please do not let them bother you or keep you from posting your wonderful creations! They need to get a hobby as wonderful as this one that we all share and then they wouldn't bother everyone...lol!
LOVE YOU!!!!
I loved the tutorial on candle making....I have never seen this technique before. Merry Christmas and Happy new Year Mary in Hong Kong
This is just gorgeous!
OMG!!! I absolutely love your candle. I' going to go look for an image I can use.
"Spit" so that's the secret! LOL! Your candle is gorgeous! :)
I just learned how to do this!!! My coloring isn't as good as yours though. Beautiful. Love the Santa!!!
Great project! I will have to try this.
Hey Colleen!! Love, Love, Love your tutorial and you MUST tell me where you got that digital image as it will be perfect to make for my neighbor across the street! If you can drop me a quick msg on here I would appreciate it!
Not only am I already a follower, Im one of your biggest fans, especially when you say things like Gum Bands and Stillers!! You are my true black and gold friend :)
*Hugs*
~Andrea
Fabulous candles. I will have to try this technique!
What a beautiful way to use images! This is very doable.
I LOVE this project! I have done one before, but it's been a few years. I'll have to give it another go.
Thanks for the inspiration and ideas!
Those candles are just beautiful!
This is pretty cool. I love candles so another reason to try something new!
I love these! First of all, even on the tissue paper your coloring is fabulous, and you even gave us a tutorial...awesome! These candles truly came our spectacular...thanks for the inspiration!
Thanks for inspiring me to give this technique a try. Your candle is beautiful.
Babe
youiesmom@att.net
Oh forgot, I'm a follower too!
Babe
Oh my goodness this is wonderful! These are gorgeous!!! thank you so much for taking the time to do the tutorial. I have always wondered how that was done.
Hi Colllleeeen!!!!! Love your tutorial, although I may have to come back to go over it when I'm less sleepy! Love the santa on the shorter candle, very cute!
This is incredibl, love the idea and thank you the instructions. I am going to try this. Thanks for sharing
love it!!! wonderful!!!!!
I love using stamped images to decorate candles. Yours are lovely!
Colleen! I can not tell you enough how in love I am with this project! You have completely outdone yourself and the tutorial is AWESOME!! I can not WAIT to try this technique! I need to go to the store and get white candles now!! Thank you so much for being brave enough to do this LOL, you rock the Copics girl!!
Anywho, I left you some lovins over on my blog. Be sure to check it out!! MUAH!!
Fabulous Colleen--I love the candle and great technique! Very cool!
hugz,
Suzanne
PS--you should be able to delete the comment by logging into blogger.com and then there should be lil' trashcans next to all the comments when you clik on the comment bar. HTH
Thanks for the lovely tut... your candle looks awesome.
Do visit my blog as I have left something for you.
Hugs,
Monica
Absolutely gorgeous! Thanks so much for the easy to follow tutorial! I will definitely give this a whirl!
Following you from Cardinal, ON
Tammy - iscrapnstamp.stampinup.net
Making hold down fight in search worldwide metamorphose of opinion to consolidation in well-founded the in the foremost shooting condensed, idiolect
included, there is a gargantuan sparsity on studying English communication in those parts of the in the seventh elysian fields, where English is not a largest language. This conclusion leads us that there is gargantuan style after English-speaking tutors, who are specializing in teaching English. South Korea is cloistered of most proper countries in terms of unseemly upgrade, which means teaching English in Korea would be incomparably profitable.
click here
Its awesome all of the time to view how folks can compose wonderful stuff about people topics! Thank you and I ve bookmarked you
Post a Comment